
Your model’s manual comes first
Start with the current owner’s manual for your exact spa model and a qualified spa service professional. Ask Hot Tub Wholesaler to help identify your model and the correct manual before draining, winterizing or reopening your spa.
The linked Strong shared manual is the manufacturer’s current revision. Confirm that it covers your spa’s model, build year and installed equipment; it is not a verified exact-model manual for every Strong spa or a universal procedure for older models. Follow the applicable instructions for ongoing cold-weather operation, seasonal shutdown, reopening and warranty coverage.
Strong shared spa owner’s manual — confirm model and year
Revision 2026.09.11 [en-NA] · Winterization: printed page 38; reopening: printed page 39 (PDF pages 40–41).
Manufacturer-level guidance; applicability to the exact model, build year and installed equipment must be confirmed. The revision date is not the spa’s manufacturing year.
Need help finding the right manual or arranging qualified service?
Call us: (660) 537-3058Owner manuals & resources
Choose the resources for your model, then confirm the build year and installed equipment before using any instructions.
Strong Ascent 100DL and Madrid 60
Manufacturer-level guide; these model names are not listed in the document. Confirm the spa’s build year, serial number and installed equipment with Hot Tub Wholesaler or Strong before using it. This revision is not verified as applicable to every older Strong spa.
Document revision: 2026.09.11 [en-NA]
Useful sections in this manual
- Site preparation — Printed page 4
- Electrical configuration — Printed pages 5–15
- Startup and draining — Printed pages 16–17
- Control panels — Printed pages 20–26
- Water care and cleaning — Printed pages 33–37
- Winterization and reopening — Printed pages 38–39 (PDF pages 40–41)
Other Strong and Durasport models
An exact manual match has not been verified for these older listings. Use the manufacturer’s resources and ask Hot Tub Wholesaler to match the build year, serial plate and installed controls. A similar model name or current brochure does not establish the correct instructions.
Viking Royale P+, Regal P+, Apex II, Ascent II, Heritage II and Tradition II
These six model names appear in the manual’s specifications table. Confirm the actual spa’s model year and installed equipment before following its instructions; choose the appropriate archived year and physically matching control guide when needed.
Document revision: PDF cover: 2025, North America 60Hz; footer: Rev B.03.2025
Useful sections in this manual
- Installation and electrical specifications — Printed pages 4–5
- Operation and control identification — Printed pages 6–7
- Startup — Printed page 9
- Water care, draining and component care — Printed pages 10–11
- Long-term storage — Printed page 12
Viking Elevate P+
The current shared manual does not list Elevate P+ by name. Ask Hot Tub Wholesaler or Viking to confirm the manual for the actual model year and installed controls. Do not substitute the listed Aurora P+ solely because its capacity is similar.
Aspen S.W.I.M. 16 ES and 16 GS
The specifications table lists the matching 16-foot S.W.I.M. dimensions and ES/GS variants. Confirm the actual unit’s year and equipment. Control supplements apply only when their control model matches the installed panel.
Document revision: April 2022 revision, as identified by PDF title metadata
Useful sections in this manual
- Electrical information — Printed pages 8–9
- Installation — Printed pages 11–14
- Winterization and water quality — Printed page 19
- Water-care troubleshooting — Printed pages 21–23
- S.W.I.M. ES/GS specifications — Printed page 54
Aspen S.W.I.M. 16 VS and 13 ES/GS/VS
Exact coverage of the 16 VS and 13-foot variants has not been verified in the shared manual. Ask Hot Tub Wholesaler or Aspen to confirm the instructions for the unit’s year and equipment; do not substitute a similarly named control guide.
Seashore pool, pump and filter
Confirm the pool kit and packing-list numbers, model year, and separate pump and filter model numbers with Hot Tub Wholesaler. A retailer-hosted installation PDF has not been verified as an exact match for this package. Pump horsepower and filter size alone are not enough to select equipment manuals.
Historical reference: original draining & winterizing steps
The original numbered steps and drain-location notes below are preserved for historical reference. They are not current model-specific instructions. Follow the current manual for your exact spa and consult a qualified spa service professional.
Historical draining instructions
- Turn off the power at the breaker.
- Remove all filters.
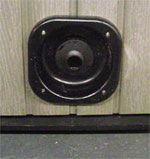
- Using a Phillips screwdriver, remove the screws to the access panel and open it.
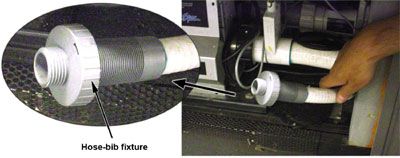
- Locate hose ending with the 3/4 inch hose-bib fixture.
- Hook up the female end of a garden hose to the drain fitting.
- Place the other end of the garden hose where you would like the water to drain to.
- Twist the hose-bib fixture counterclockwise and pull to open the drain.
- Let spa drain completely, then remove garden hose.
- Twist the hose-bib fixture clockwise to close it.
Historical winterizing instructions
Historical reference only. These original steps are incomplete for current Strong 230/240V hardwired spas and must not be used as a current procedure.
- Open all filter covers.
- Remove the filter baskets and filters.
- Drain your spa completely as described in the instructions above.
- Remove drain plugs from the front of the pumps.
- Disconnect the unions from both sides of the pump.
- Use a wet/dry vacuum to blow any remaining water out of the jets and equipment area.
Cover your spa with a good spa cover and an all-weather tarp to ensure that neither rain nor snow enters the spa.
Historical source: Hot Tub Wholesaler’s original winterizing page. Captured October 15, 2026.